
Disk troubleshooting is a necessary skill for any PC user. If you’re experiencing disk usage problems on Windows, these are some of the most common fixes that might help:
The “windows 11 disk 100 usage fix” is a problem that has been present for a while. There are 7 working solutions to fix the issue.
Have you noticed that your Windows 11 machine has been sluggish after the Windows update? Programs take a few seconds to reply, and disk use appears at the top of the task manager. So, what’s the deal with Windows 11’s 100% disk usage? Too many applications running during startup, a virus or malware infested machine, outdated drivers, improper virtual memory, or a disk drive malfunction are all typical causes of this problem. Apply the remedies suggested below to repair your computer if it is not performing properly or if Windows 11 is using a lot of disk space.
High Disk Usage in Windows 11
If your computer’s disk use continues to be excessive, the first thing we suggest is restarting it. When you restart your computer, the Windows operating system is forced to reload, which fixes any small bugs or glitches that may have caused the issue.
Use the most recent antivirus or antimalware software to do a comprehensive system scan. Uninstalling a third-party antivirus, according to several customers, helps them address the excessive disk utilization issue on Windows 11.
Disconnect any external media storage devices (external HDDs, pen drives, etc.) as well.
Disable Windows’ search function.
Windows search, which runs in the background for most users, requires a significant amount of hard drive processing power, resulting in a high disk utilization issue in Windows 11. Let’s try stopping or disabling the Windows search service and checking the disk use status using the instructions below.
- As an administrator, open the command prompt.
- Then, to stop Windows Search from operating in the background, enter the command net.exe stop Windows search.
Open taskmanager once again and verify the disk use status; if it drops, permanently disable the Windows search service by following the procedures below. However, if the disk consumption stays the same at high, go on to the next option.
- To open Services.msc, press Windows key + R, enter services.msc, and then click OK.
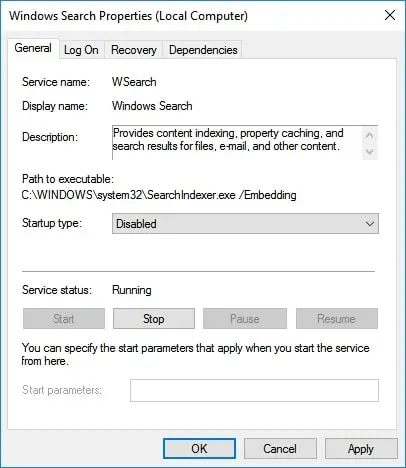
- This will open the Windows Service Console, where you can find the Windows Search Service by scrolling down. Select properties from the context menu by right-clicking on it.
- If the service is ‘Running,’ set the Startup type to Disabled and click “Stop.”
- Finally, click “Apply” and “OK” to make the modification permanent.
Virtual Memory Reset
Virtual Memory is one of the most helpful features since it makes use of HDD space and helps you to free up RAM storage space fast. There’s a risk that incorrect virtual memory settings are to blame. Let’s restore virtual memory to its default configuration and see whether it helps us save space.
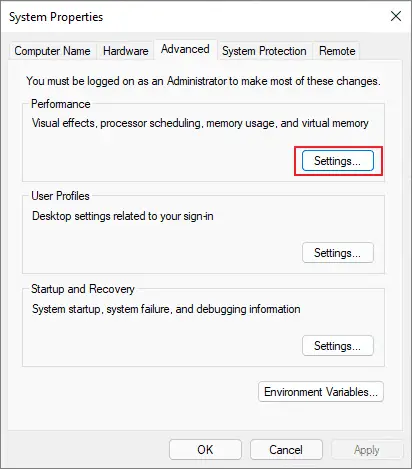
- Using Windows key + R, type sysdm.cpl and hit enter.
- Switch to the “Advanced” tab, then hit the “Settings” button in the “Performance” section to enter the system properties window.
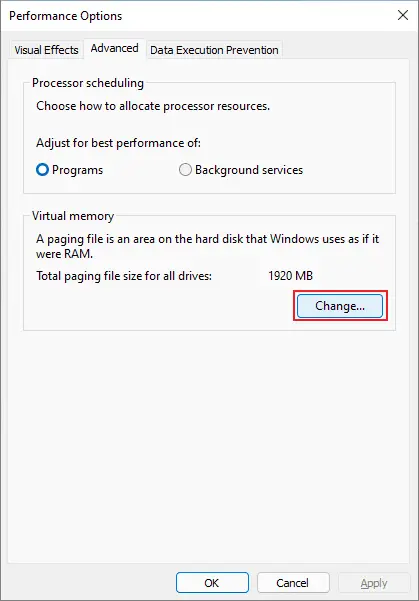
 Move to the Advanced tab on the next window, then press “Change” under virtual memory.
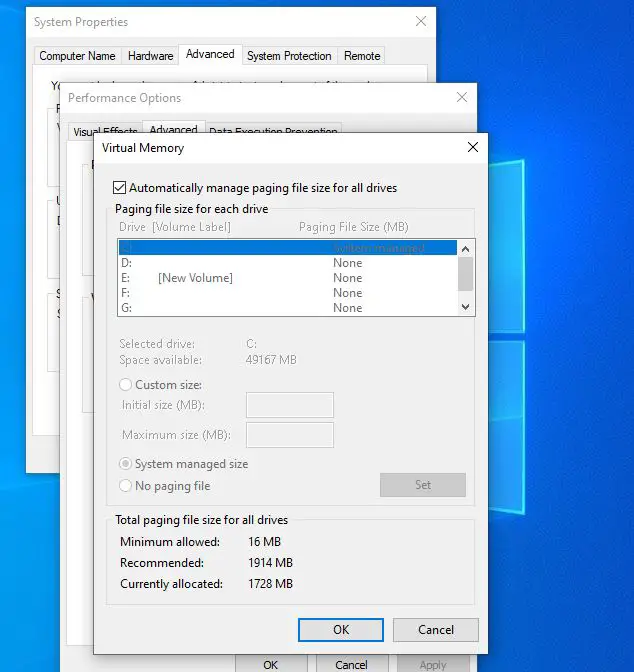
- Finally, choose the option to “Automatically manage paging file size for all disks.”
- To save the most recent changes, use the apply and OK buttons.
Clear the transient files and outdated data after resetting the virtual memory by following the procedures below.
- Using the Windows key + R combination, type percent temp percent and press the enter key.
- To delete temp/junk files from your device, press Control + A to select all files, right-click on the selection, and then pick “Delete.”
- Finally, restart your computer and look at the Windows 11 100 disk utilization status.
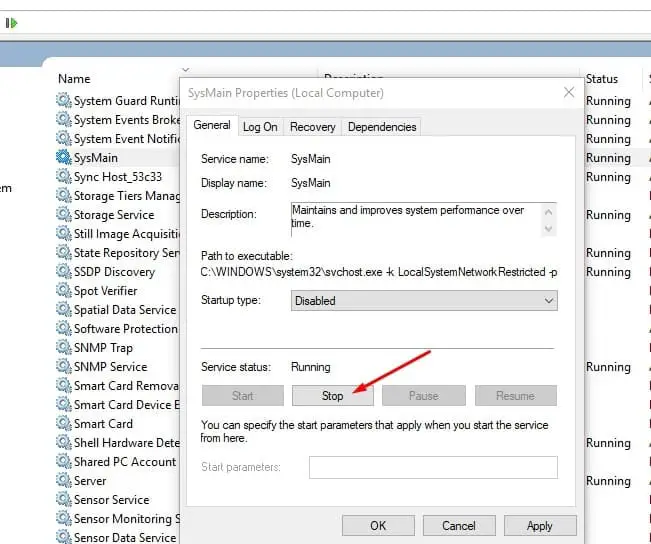
Turn off the SysMain service.
Sysmain, formerly known as superfetch, is a Windows service that aids in the preloading of commonly used software to improve system efficiency. It also keeps note of which applications are used on certain days of the week or in what order, and loads them appropriately. Although this service significantly improves speed, it is also renowned for high disk utilization. Follow the instructions below to disable the sysmain service and see if it helps reduce disk consumption in Windows 11.
- To open Services.msc, press Windows key + R, enter services.msc, and then click OK.
- This will open the Windows Services Console; scroll down to find the sysmain service, right-click on it, and choose properties.
- Disable and stop the service adjacent to the service status by changing the starting type.
- Finally, at the bottom, click apply and ok to preserve the changes and reboot your computer.
- Examine the state of the Windows 11 100 disk utilization issue now.
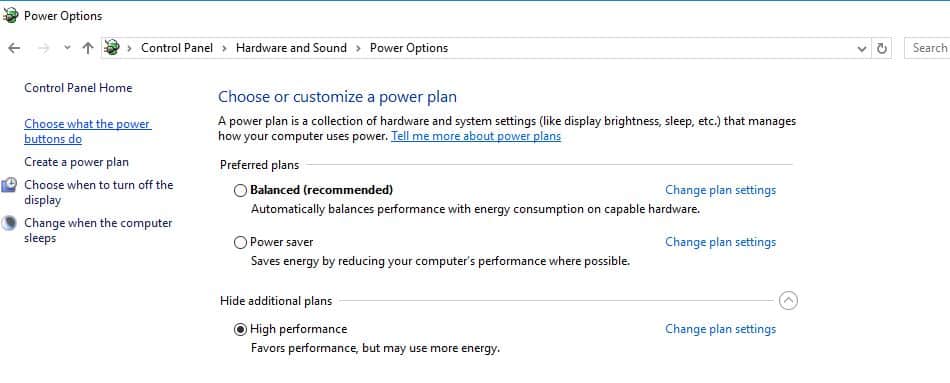
Select High Performance from the Power Options menu.
Changing the power choices to Excessive performance, according to several customers, helps them address the high disk consumption issue on Windows 11.
- Using the Windows key + I, go to settings, then system, then power & sleep from the left.
- Now, on the right side, pick the “Additional Power Settings” option.
- Pick the High-performance radio button, then select “Change Plan Settings” from the drop-down menu.
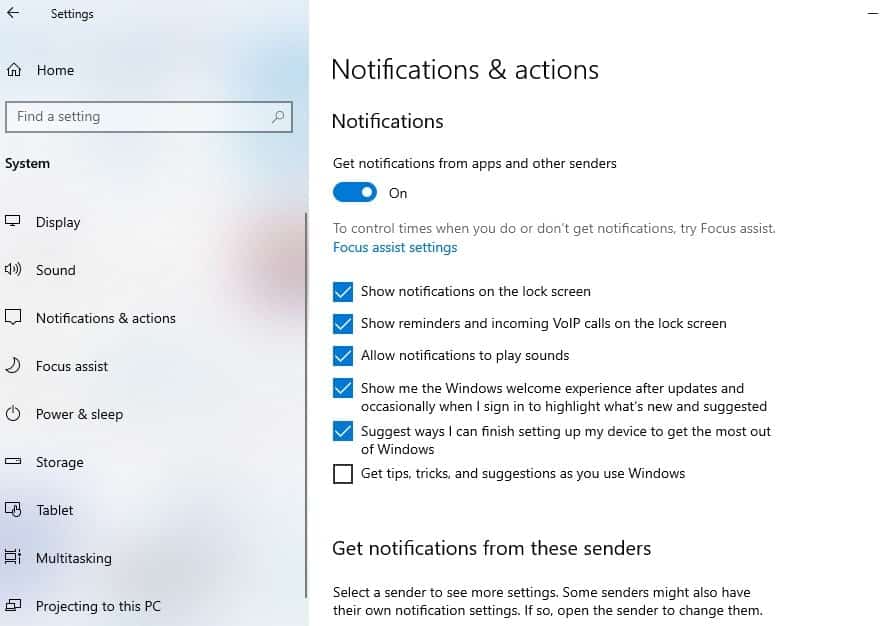
Windows Notifications should be turned off.
This is another solution suggested by people who had the same issue.
- Use the Windows key + I to open the settings menu, then choose System.
- Uncheck the Get tips, ideas, and recommendations as you use Windows box under Notifications & actions.
Clean up the boot
There’s a potential that third-party programs or starting services are using system resources. Clean boot windows allow you to start your system without any third-party apps interfering. Check the high disk use status after starting Windows 11 in a clean boot condition.
- Click OK after pressing Windows key + R and typing msconfig.
- Select the Selective startup radio button and tick the option “Load system services” in the system configuration box.
- Then, on the services tab, choose Hide all Microsoft Services from the drop-down menu.
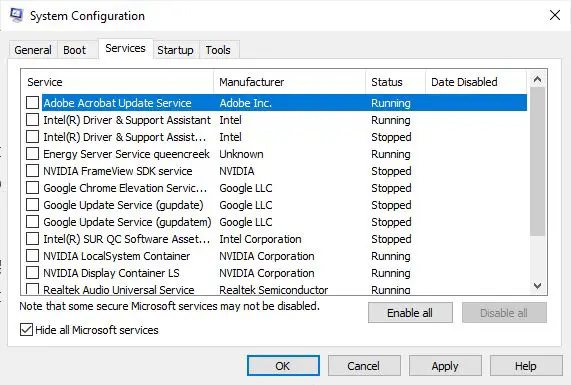
- All system services will be disabled, and all third-party services will be chosen. Finally, click the disable all button.
- To launch the taskmanager, go to the startup area and click the open taskmanager link.
- Locate any unnecessary apps that start up with the system and deactivate them with a right-click.
- After clicking apply and ok, restart your computer. Check to see whether the disk utilization has decreased.
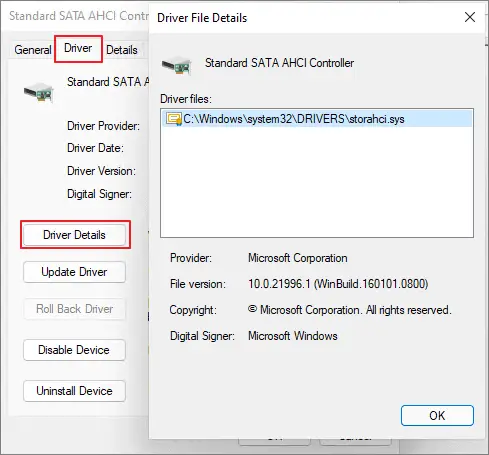
StorAHCI.sys Driver should be fixed.
Another approach may assist in resolving the Windows 11 high disk utilization issue.
- To launch device manager, press Windows key + R, enter devmgmt.msc, then click OK.
- Look for “IDE ATA/ATAPI Controllers” in the Device Manager window. It should be tapped.
- Select Properties from the right-click menu for Standard SATA AHCI Controller.
- Switch to the “Driver” tab in the driver properties box, then select the “Driver Details” button.
- Now look in the window for a file titled “storahci.sys.” If that’s the case, you’ll need to deactivate it in the registry.
- Close this window by tapping OK.
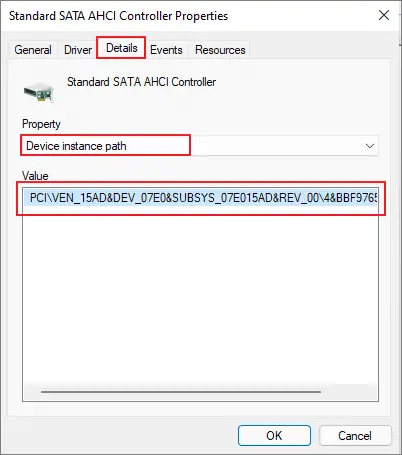
- Return to the properties window for the “Standard SATA AHCI Controller” and choose the “Details” tab.
- Copy the location path displayed under “Value” after selecting “Driver path Instance.”
- Now hit Windows key + S and put regedit into the search box, then choose the first result.
- This will launch the Windows registry editor; browse to the location below. HKEY LOCAL MACHINE SystemCurrentControlSetEnumPCI is a SystemCurrentControlSetEnumPCI class (AHCI Controller) Parameters of the device MessageSignaledInterruptPropertiesMessageSignaledInterruptPropertiesMessageSignaledInterruptPropertiesMessageS
- Select the MSISupported file by double-tapping it. In the Value data field, type “0.” Then press the OK button.

After you’ve completed the instructions above, restart your computer, then visit Task Manager to see whether you’re still seeing excessive disk utilization on Windows 11.
Carry out a Disk Check
If none of the other options work, the disk drive should be checked for faults as a final attempt. To check and attempt to solve the issue, type chkdsk in the Command Prompt.
- As an administrator, open the command prompt.
- Enter the command chkdsk c: /f /r /x into the command prompt.
- When it asks whether you want to plan a disk check for the next start, type Y and press enter.
- Restart your computer after closing the command prompt.
- This will scan your hard drive for faults and attempt to correct them. Allow the scanning procedure to finish completely.
- It will immediately restart your computer; now verify the disk utilization status.
Again Due to poor contact with the SATA connection, the disk may have to work more than normal to get the data across. We propose reconnecting or replacing the SATA cable.
Also check out:
 this advertisement should be reported
Watch This Video-
The “windows 10 100% disk usage 2021” is a problem that has been present for a while. There are 7 working solutions to fix the issue.
{“@context”:”https://schema.org”,”@type”:”FAQPage”,”mainEntity”:[{“@type”:”Question”,”name”:”How do I fix disk 100% usage Windows 11?”,”acceptedAnswer”:{“@type”:”Answer”,”text”:”A: If you are having a problem with disk 100% usage, there is a chance that your drive has failed and needs to be replaced. The best way to fix this would be by formatting the hard drive and installing Windows again.”}},{“@type”:”Question”,”name”:”How do I permanently fix 100% disk usage?”,”acceptedAnswer”:{“@type”:”Answer”,”text”:”A: You can run the Disk Cleanup utility in your Start menu to remove unnecessary files and settings.”}},{“@type”:”Question”,”name”:”How do I fix 100 disk usage when opening programs?”,”acceptedAnswer”:{“@type”:”Answer”,”text”:”A: This is a Windows issue, and can be fixed by following these steps.
1) Start Command Prompt as administrator. 2) type diskpart 3) Hit enter 4) Type list volume 5) In the first column youll see all of your disks listed 6). Now type select volume 0 7), and hit enter 8 )Type extend filename=d:usersANDREW-PCdesktop 9),and hit enter 10 ̷type exit 11 ),then press Enter 12 ). Press F2 to restart computer 13).”}}]}
Frequently Asked Questions
How do I fix disk 100% usage Windows 11?
A: If you are having a problem with disk 100% usage, there is a chance that your drive has failed and needs to be replaced. The best way to fix this would be by formatting the hard drive and installing Windows again.
How do I permanently fix 100% disk usage?
A: You can run the Disk Cleanup utility in your Start menu to remove unnecessary files and settings.
How do I fix 100 disk usage when opening programs?
A: This is a Windows issue, and can be fixed by following these steps.
1) Start Command Prompt as administrator. 2) type diskpart 3) Hit enter 4) Type list volume 5) In the first column youll see all of your disks listed 6). Now type select volume 0 7), and hit enter 8 )Type extend filename=d:usersANDREW-PCdesktop 9),and hit enter 10 ̷type exit 11 ),then press Enter 12 ). Press F2 to restart computer 13).
Related Tags
- will windows 11 fix 100% disk usage
- windows 11 high disk usage reddit
- fix disk 100 windows 11
- windows 11 disk usage
- how to reset virtual memory windows 11